

How To Repair The Screen On My Ipod Nano Touch
Repair Guides
iPod Nano 6th Generation Disassembly Repair Guide
June 4, 2022 | 0 Comments

View the downloadable version of our how to fix your iPod Nano 6G screen guide.
This guide will help you take autonomously the latest iPod Nano 6th generation adequately easily in a step by step manner giving you a risk to replace faulty parts. It should also help you take apart your Nano to a certain point, supersede the parts which are not working and then put it dorsum together once again following the instructions in reverse.
This guide should aid you replace the following parts:
- iPod Nano sixth Generation Affect Screen Digitizer Replacement
- iPod Nano 6th Generation Battery Replacement
Tools:
- Minor Phillips Screwdriver
- Safe Open up Pry Tool
- Heat Gun / Pilus dryer (optional)
iPod Nano 6th Gen disassembly Guide:
- The first stride is to remove the display from the casing. To practise this use a heat gun or a hairdryer to slightly estrus the adhesive backside the screen. Once warmed y'all should be able to gently pry the screen away from the casing.
- Now that the display has been separated (withal dangles by the connector ribbon) the next step is to remove the EMI shied from the Nano using a small Phillips screwdriver. In that location are two screws here that need to be removed in lodge to have out the EMI shield.
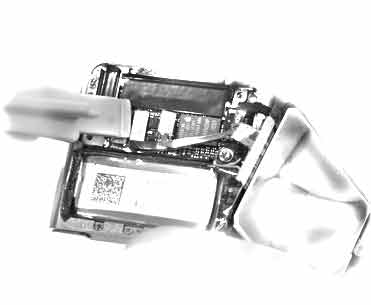
- In gild to completely remove the brandish the digitizer cable and the display's data cable volition have to be asunder. This can easily be accomplished by lifting the connector out of place using the Condom Open Pry Tool every bit shown in the analogy higher up.
- Y'all volition be able to see the Nano 6th gen touch on screen digitizer and LCD screen are together equally one unit. To separate you volition need to use the estrus gun or hot hairdryer again. Once done gently and slowly pry apart. Start and one edge and work your way round.
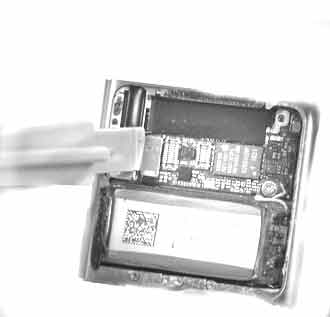
- Now the side by side step is to remove the headphone jack / power connector from the lath. This tin can hands exist achieved past lifting it out of place using the condom open pry tool as shown in the illustration to a higher place.
- At this point you should be able to pull out the board after removing the one logic board screw using a small Phillips screwdriver.
- The battery can hands be pried out using the Nano's opening tool simply since the wires are soldered to the board the battery cannot be completely removed without having to de-solder the wires.
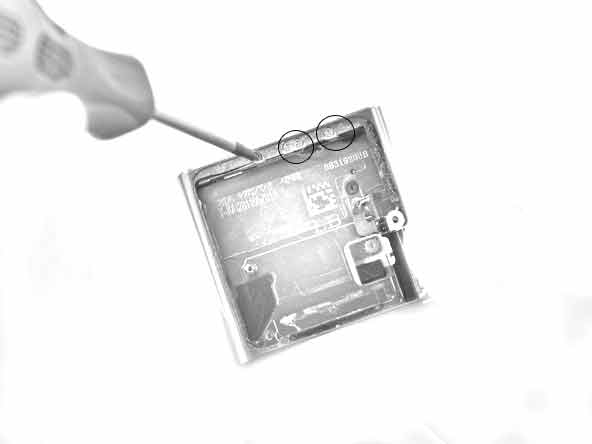
- Removing the headphone jack and its button contacts will require removing the long ribbon cablevision which runs along the edges of the Nano'southward casing. The button contacts tin can easily be removed by taking out the 4 small screws that agree them in place on the border of the casing. Later on the contacts are removed you just need to remove one more screw on the headphone jack and it should come out of place with the help of the iPod Nano opening tool as shown in the illustration above.
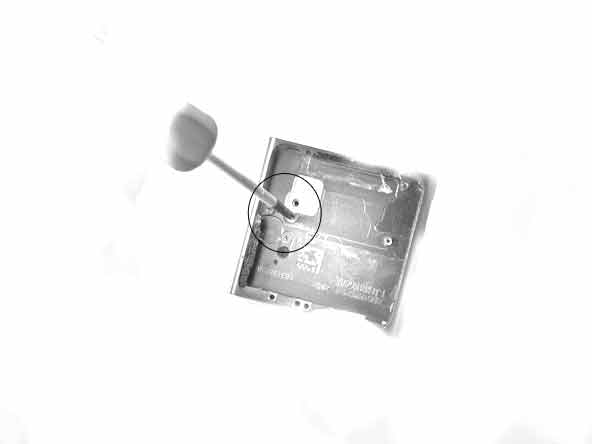
- You will demand to take out 3 more screws in order to take out the new prune installed in the iPod Nano equally shown in the illustration above.
- Your iPod Nano is now completely disassembled.
The new 6th generation Nano is fairly easily to take apart merely you demand to be very conscientious of the small cable ribbons. In order to put everything back together again and replace any faulty parts just follow this guide in contrary.
Notice:
Repairs Universe's guides are for informational purposes only. Please click hither for details.
Learn most restrictions on reproduction and re-use of Repairs Universe'due south repair/take-apart/installation guides, and near creating hyperlinks to our guides.


Copyright © 2022 RepairsUniverse.com. All Rights Reserved. All trademarks are property of their corresponding holders.
RepairsUniverse is an independent company and is in no way affiliated with Apple tree, Amazon, Asus, HTC, LG Electronics, Motorola, Nokia, Microsoft, OnePlus, Samsung. Repairs Universe is a third party replacement parts wholesaler of loftier-quality LCD screen, touch drinking glass and digitizer screen replacements and repair parts for iPhone, iPad, Blackberry, PSP, Zune, Droid, HTC, Nokia and many other cell phones.

How To Repair The Screen On My Ipod Nano Touch,
Source: https://www.repairsuniverse.com/blogs/repair-guides/ipod-nano-6th-gen-disassembly-screen-repair-guide
Posted by: haygoodcapaidep35.blogspot.com
0 Response to "How To Repair The Screen On My Ipod Nano Touch"
Post a Comment